
{ Practical astronomy | Optics and imaging | Image reduction }
Image reduction
There can be several reasons to process an image and not just leave it as it comes out of the camera. One way or another we want to suppress or remove things that we don't like and emphasise those that we do like. This is not just a question of taste. Bias, dark current and excessive noise, objectively, do not belong in a good image. Removing or suppressing them is a good thing.
If the image as produced by the camera cannot be improved, we should not waste time trying. If the exposure is well balanced, not saturated, free of visible noise, without hot pixels or stripy bias patterns, and if it is already an 8-bit JPEG with not too much nor too little compression, then we should leave the image as it is. But if we push our equipment to the limit, are looking for faint objects, fighting the bright city sky, or try to see small detail on another planet, then we usually need to process the frames. Hence, we need to take flames that can be processed. We want to avoid JPEG compression and gamma correction, if possible. We rather have raw frames with as many bits digitisation as possible. We take bias and dark frames, perhaps also flat fields. Finally, we take a number of frames so we can stack them together into a better single one.
There is a little paradox in image processing that you should be aware of before taking frames. In order that we can remove or suppress features like bias or noise from our images these features must be recorded in the first place. In particular, to reduce noise by stacking frames, we must use an amplifier gain (ISO setting) and data format so that the noise is recorded in the images. JPEG compression is not very good at this, because it spoils the statistical independence of the pixels. Even in raw frames a low gain could reduce the noise so far as to count less than one digitisation unit. That is not enough, the standard deviation of the noise must be more than one digitisation unit to record the noise properly. Two digitisation units per standard deviation of the noise is perhaps an ideal value, enough to record the noise but not wasting precious digitisation bits on oversampling noise.
Data reduction is the first part of image processing. These are standard procedures to correct according to dark frames and flat fields, to suppress noise by stacking, and to subtract unwanted background. To carry out these tasks it is best to use a floating point FITS format (FITS Working Group 2008), which supports the mathematical operations far better than an integer format with limited dynamic range an the potential of saturation.
For processing, we need software. I use the Linux operating system, as most professional astronomers do. I have written my own suite of utilities Chicam to stack frames and to apply dark and flat corrections. In addition I use the Starlink software collection (East Asian Observatory 2017, Currie et al. 2017, Draper et al. 2011, Currie et al. 2015, Draper et al. 2014). A vital role is played by dcraw (Coffin 2016) to convert raw data from vendor-specific formats to 16-bit PPM. The output from this is not as raw as I sometimes need, and so I have hacked the source code to avoid the colour balance processing that dcraw would insist on doing. A useful little utility is jhead (Wandel 2015) to list the exposure parameters from a JPEG header.
Bias, dark and flat
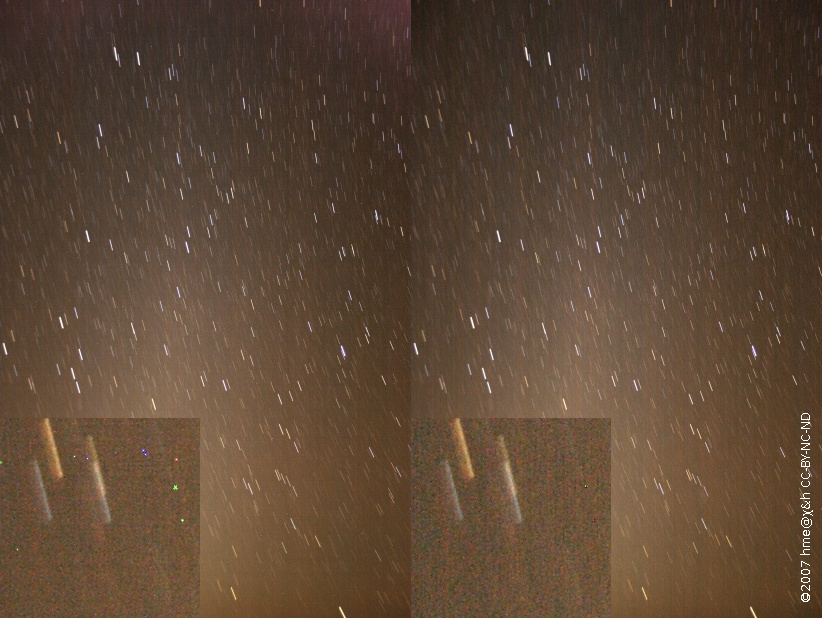
A picture of the zodiacal light before and after dark subtraction. The high resolution inserts show the effect of correcting for warm pixels. Also note the correction of the bright top right corner.
The bias and dark current contributions to the frames are very easy to record. Simply take an exposure just like the sky frame – same exposure time and gain setting – except you put the lid on the lens to leave the detector in darkness. Other things like the ambient temperature should also be the same, so best do this just before or after the sky frames are taken. The resulting reference frame contains the bias and the dark current. Simply subtract this dark frame d from the sky frame i to clean up the latter.
I(x,y) = i(x,y) - d(x,y)
A flat field is a reference image taken with the lid open, through the same optics as the real image, but looking at a uniformly bright object, ideally a white one. The exposure time will be different so that the flat field is not overexposed. Take a dark frame df matching the flat field exposures f so as to correct the flat field for dark current and bias. The resulting flat field F is normalised so that it has average value 1.0 and the dark-corrected sky frame is divided by it. The flat and the sky frame are each dark-corrected first, then the sky frame is divided by the flat field:
F(x,y) = f(x,y) - df(x,y)
Fn(x,y) = F(x,y) / <F(x,y)>
I(x,y) = (i(x,y) - d(x,y)) / Fn(x,y)
Observe that flat correction without prior dark correction of both the sky frame and the flat field is not accurate.
The mathematical operations involved are not complicated. They can be carried out by my Chicam utilities, with utilities from the Starlink KAPPA package (Currie et al. 2017), or more elaborately with the Starlink CCDPACK package (Draper et al. 2011).
Noise and stacking
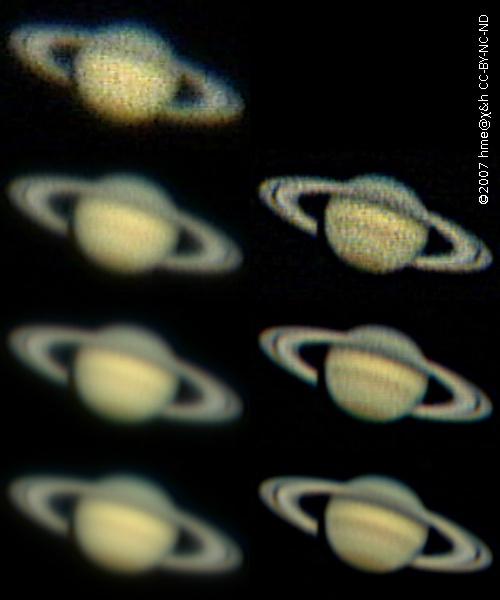
Webcam images of Saturn. From top to bottom the number of frames in the stack is 1, 8, 64 and 512, resp. On the right are versions with unsharp masking. Observe how the noise reduces with number of frames.
Noise can also be recorded in a reference frame. Simply take two dark frames and subtract them from each other. The dark current and bias are thus eliminated and what remains is the combined noise from the two dark frames. Such an image is of no use. It shows the random pattern of noise as it turned out when the two dark frames were taken. The real image has a different pattern of noise. That is the trouble with the random processes that cause the noise: Each time you look at it it looks different from last time.
We can turn this randomness to our advantage. If we take not one but four frames of the same object, each contains the same signal from the object. Each contains a different pattern of noise. If we add up the four frames, the noise partially cancels itself. While the signal is four times as strong, the noise will only double. In general, if we take n images the signal is multiplied by n, but the noise is multiplied by √n. The signal-to-noise ratio increases by a factor √n.
In practice, stacking is not as simple as adding frames. Chances are, the object has moved within the field of view between successive frames. Stacking software will have to establish these frame shifts and undo them before adding the pixel values from all the frames into the stacked image.
My Chicam software uses a Fourier transform (Frigo et al. 2017) to determine shifts between frames, and this works well for any bright object on a dark background, provided the background surrounds the object along all image edges. If there is also a rotation of the field, then I use Starlink's CCDPACK (Draper et al. 2011) to (i) find the stars, (ii) identify them in all frames, (iii) determine the shift and rotation, (iv) re-sample each frame onto a common pixel grid, and (v) mosaic all frames together. If the lunar or solar limb runs through the frames, then neither Chicam nor CCDPACK will work. As a last resort, one can use Gaia (Draper et al. 2014) to tediously locate one feature in each of them and thereby determine the frame shifts.
Noise propagation
Stacking frames, subtracting darks, dividing by flats – how does the noise in all of these components propagate and combine into the final image? Roughly speaking, the end result is noisier than the noisiest input component. We must not only take multiple sky frames (to reduce the noise in them), we must take at least as many frames for the flat and its darks.
There is one exception to this. If all sky frames are shifted against each other, then a single dark frame also experiences distinct shifts and looks different in each sky-minus-dark operation. We need only one or two dark frames, even if many more sky frames are being stacked. But this is true only if the sky frames all have non-zero shifts. If many or all sky frames are without shift, then at least as many dark frames are needed as there are sky frames.
The pros and cons of stacking
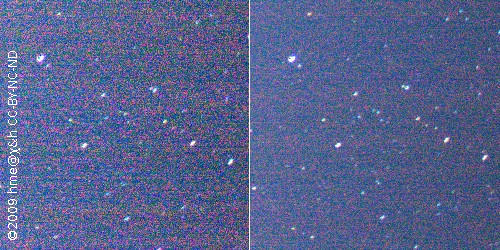
Comparison of details from two circumpolar images. Left is a stack of four 30 s frames, right is a single frame of 120 s exposure. The single frame has less noise and less horizontal artefacts from incomplete bias and dark correction.
Stacking sounds like a great way to reduce the noise in images. However, there is a much better way to reduce the noise: Take a longer exposure. Consider taking an exposure n times longer instead of taking n exposures and stacking them. The signal will still grow by a factor n, but the noise may actually not grow at all, certainly less than √n. To understand this you must know that much of the noise is generated when the image is read out from the detector. In the extreme, one long exposure may have almost the same noise level as one short exposure.
Another thing to consider about stacking is how much effort and disc space goes into it. To double the signal-to-noise ratio, you need four frames. To double again, you need 16 frames. For another factor two, you need 64 frames. And so on.
Stacking is necessary when there is no alternative. In particular, longer exposure may not be an option:
- The camera might not take longer exposures. E.g., it might not have a "bulb" exposure setting. Also, the dark current might be drowning the image. Or, the battery might fail before the exposure completes.
- The object might not permit a longer exposure. E.g., a bright star of interest might saturate before a faint star is detected. Also, the sky background might drown the image when exposed longer.
- A longer exposure might blur the image. E.g., a planet at high magnification would bounce around the field of view due to scintillation or due to wind shaking the optics and mount. Or, we might have no tracking mount or no guiding facilities and stars would become trails in a longer exposure. Similarly, a tracking alt-az mount has limited exposure length due to field rotation.
When stacking, we have three parameters to play with to accomplish the best stacked image in the presence of noise. These are the exposure used for each frame, the gain or ISO setting, and the number of frames taken. These are the priorities for doing it right:
- Digitise the noise. The gain or ISO setting must be high enough that the standard deviation in the noise is digitised as at least two units. That provided, gain/ISO should be set as low as possible.
- Avoid saturation. The exposure time has to be short enough not to overexpose the brightest objects of interest.
- Maximise the signal to noise ratio. How?
- Maximise the exposure time of the frames. Without overexposing, of course.
- Maximise the number of frames. This is less efficient than extending the exposure of each frame.
- Increase gain/ISO. Chances are this is not possible, since we already maximised exposure time. But sometimes, exposure is limited by other factors like blurring and trailing.
Background subtraction
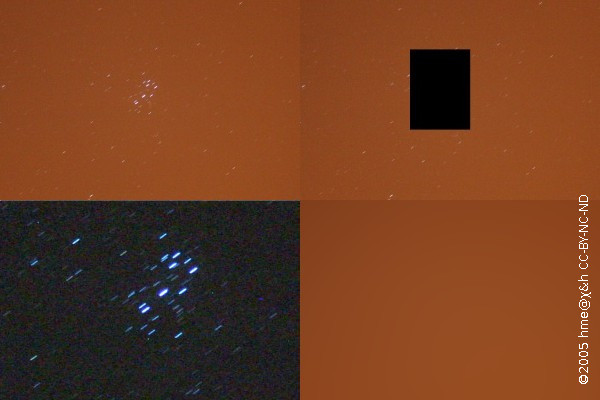
Deep sky images taken from the city suffer from a bright orange background. Provided there is enough background area in the image (top left), the object can be cut out (top right), the background fitted and extrapolated into the gap (bottom right), then subtracted and the background area cropped away (bottom left).
It is hard to find an observing site these days that does not suffer from some level of light pollution. In the UK, the bulk of the pollutant is orange due to the line spectrum of the sodium streetlights. Strictly speaking, this is a foreground and not a background, as the sodium scattering occurs closer to the camera than the emission of starlight. Since it spoils the dark background of the empty universe, we call it a background anyway.
If you have applied flat-field correction and if the field of view is only a few degrees or less, then the background should be flat or at least have no more than a simple gradient. It is probably not possible to record the sky background separate from the object: Taking a picture somewhere else on the sky will in general have a different level of background and a different gradient.
The thing to do is to take the images with enough spare field of view where only the background – and inevitably a constant sprinkling of stars – is recorded. If the object of interest is quite bright, its area should be cut out of the image. The remainder can then be fitted with a flat or linear surface and that fit subtracted from the image proper. If no flat-field correction was made, the background will show vignette and a curved surface will have to be fitted.
For this kind of work, I use the Starlink KAPPA package (Currie et al. 2017), which can "zap" an area in an image, fit polynomial or spline surfaces to the background, and carry out the necessary image arithmetic to subtract the fitted background from the original.
